In this exercise, you will load a ready-made demo Zettelkasten into your Obsidian vault, explore it using Graph View, and add your own Zettel notes to it.
Part 1: Add the demo Zettelkasten to your note-book
Step 1: Download and unzip the demo material
- Download the Zettelkasten Demo Material ZIP file from the workshop here
- Save it somewhere easy to find (Desktop or Downloads).
- Unzip the file (Right-click → Extract / Unzip).
The extracted folder should contain one folder: Zettelkasten
Step 2: Add the demo folders to your vault
You first need to open your vault in your system’s explorer.
- In Obsidian, right-click any note in the File Explorer panel.
- Click Show in system explorer/finder.
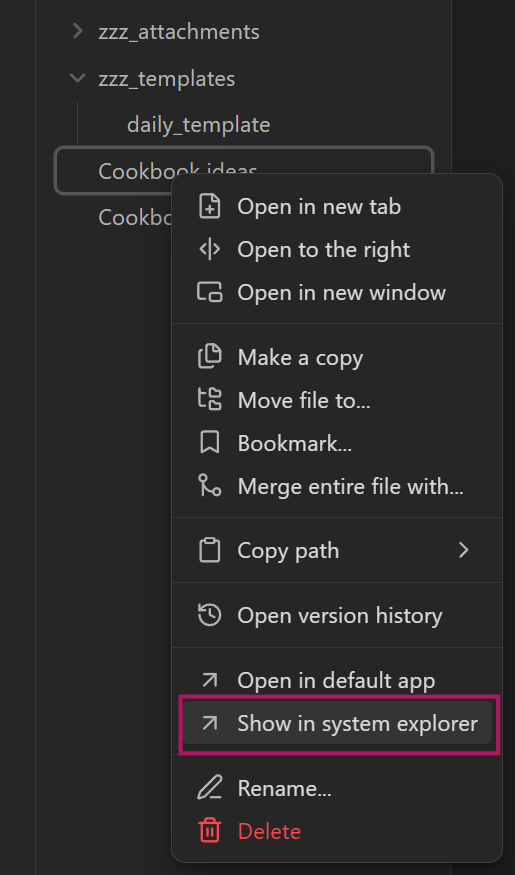
Your system explorer will now open in the correct location
- Drag or copy the
Zettelkastendemo folder into this vault folder
Check that now in Obsidian you see this new Zettelkasten folder and that there are notes inside.
Part 2: Explore the demo Zettelkasten
Step 1: Open and filter the Graph View
- In the left sidebar, click the Graph View icon (network icon).
Alternative hotkey to open the graph view:
- Windows/Linux: Ctrl + G
- Mac: Cmd + G
Filter for Zettelkasten notes
- In Graph View, click the Settings (gear icon, top right).
- Click inside the search bar.
- Select Path.
- Choose the
Zettelkastenfolder you just added.
Now you should see a graph view of only the demo Zettelkasten.
Step 2: Explore the Zettelkasten graph
Take a moment to familiarize yourself with the Zettelkasten. Below are some things you can do.
Adjust the layout
- In Graph settings, adjust sliders in Forces and Display.
- Try to find a layout where clusters and hub notes are easy to see.
Reset layout
Click the round arrow icon in Graph settings to restore default layout if needed.
Open and preview notes
Try different ways to read notes from the graph:
- Click a circle (node) to open the note
- Hold Ctrl (Windows/Linux) or Cmd (Mac) and click to open in a new tab
- Hold Ctrl/Cmd and hover over a node to preview the note
Avoid clicking dead links
Slightly transparent nodes represent dead links. Clicking them will create a new empty note.
Explore notes related to “garlic”
Now isolate a topic cluster.
- Open Graph View settings.
- Find Groups.
- Click New group.
- In the filter, filter for “garlic”
All notes containing “garlic” should now be highlighted.
Part 3: Add your own Zettel notes
Step 1: Create a Zettel template
- Open your Templates folder.
- Create a new template file called
Zettel template - Add this content (Use the copy-paste button in the top right):
---
id: {{date:YYYYMMDD}}{{time:HHmm}}
topics:
---
# {{title}}

# Related

# References
If parts appear red, that is normal. Obsidian will resolve this when the template is used.
Step 2: Set default location for new notes
- Open Settings → Files & Links.
- Find Default location for new notes.
- Choose: In the folder specified below
- Select your
Zettelkastenfolder.
New notes will now be created inside the Zettelkasten.
Step 3: Create Zettel notes
You will now create your 1-2 of your own Zettel notes.
Zettel topics
Use any topic you like. For example:
- Turn one of your recipes into a Zettel
- Create a note about a concept or idea
Focus on learning the workflow, not writing perfect notes.
Repeat the following workflow for each new Zettel:
- Press Ctrl + O (Windows/Linux) or Cmd + O (Mac).
- Type a title and press Enter.
Use short descriptive titles for your Zettel notes
- Insert the Zettel template.
- Option A: Click “Insert Template” button in left sidebar → Zettel template
- Option B: Command palette (Ctrl/Cmd + P) → Insert Template → Zettel template
Template error
If applying the template fails
- Open Settings → Templates
- Make sure: Template folder location is set to your Templates folder.
- Add the content to your Zettel (for example a recipe or short idea)
- Add links to your Zettel note:
- Related notes from the Zettelkasten in the “Related” section
- Broader topics in the “topic” property section
- Open Graph View and find your note. What is it connected to? Where does it appear in the structure?
Optional tasks (for the fast ones)
You can do these in any order or skip them and take a break.
Download and explore the demo notebook
I created a demo notebook with all the workflows and template examples used in the workshop. Go to Demo Vault to download and learn how to open the notebook on your machine.
Add more Zettel notes
Practice the workflow by adding a few more notes.
Use any topic, this Zettelkasten is for experimentation and does not need to be consistent or pretty.
Edit notes from graph preview
- Ctrl/Cmd + hover over a node to open the preview
- Edit directly in preview:
- Add a link
- Add topic in the topic property
- Edit the text Observe how changes affect the graph
Create an overview Base
This is a bit more difficult and uses a technique from the last session.
- Create a file
00_Overviewin the Zettelkasten - Insert an empty Base block:
```base
```- In the Base interface:
- Add a filter for the
Zettelkastenfolder - Show
topicsproperty in the table
- Add a filter for the